How to Continue Loop in Armsim After Error
In the Instruction Set chapter we talked about the fact that there are different Thumb versions. Specifically, the Thumb version which allows conditional execution (Thumb-2). Some ARM processor versions support the "IT" instruction that allows up to 4 instructions to be executed conditionally in Thumb state.
Reference: http://infocenter.arm.com/help/index.jsp?topic=/com.arm.doc.dui0552a/BABIJDIC.html
Syntax: IT{x{y{z}}} cond
- cond specifies the condition for the first instruction in the IT block
- x specifies the condition switch for the second instruction in the IT block
- y specifies the condition switch for the thirdinstruction in the IT block
- z specifies the condition switch for the fourthinstruction in the IT block
The structure of the IT instruction is "IF-Then-(Else)" and the syntax is a construct of the two letters T and E:
- IT refers to If-Then (next instruction is conditional)
- ITT refers to If-Then-Then (next 2 instructions are conditional)
- ITE refers to If-Then-Else (next 2 instructions are conditional)
- ITTE refers to If-Then-Then-Else (next 3 instructions are conditional)
- ITTEE refers to If-Then-Then-Else-Else (next 4 instructions are conditional)
Each instruction inside the IT block must specify a condition suffix that is either the same or logical inverse. This means that if you use ITE, the first and second instruction (If-Then) must have the same condition suffix and the third (Else) must have the logical inverse of the first two. Here are some examples from the ARM reference manual which illustrates this logic:
ITT ENE ; Next 3 instructions are conditional ANDNE R0, R0, R1 ; ANDNE does not update condition flags ADDSNE R2, R2, #1 ; ADDSNE updates condition flags MOVEQ R2, R3 ; Conditional move IT EGT ; Next 2 instructions are conditional ADDGT R1, R0, #55 ; Conditional addition in case the GT is true ADDLE R1, R0, #48 ; Conditional addition in case the GT is not true ITT EEEQ ; Next 4 instructions are conditional MOVEQ R0, R1 ; Conditional MOV ADDEQ R2, R2, #10 ; Conditional ADD ANDNE R3, R3, #1 ; Conditional AND BNE.W dloop ; Branch instruction can only be used in the last instruction of an IT block
Wrong syntax:
ITNE ; Next instruction is conditional ADD R0, R0, R1 ;Syntax error: no condition code used in IT block.
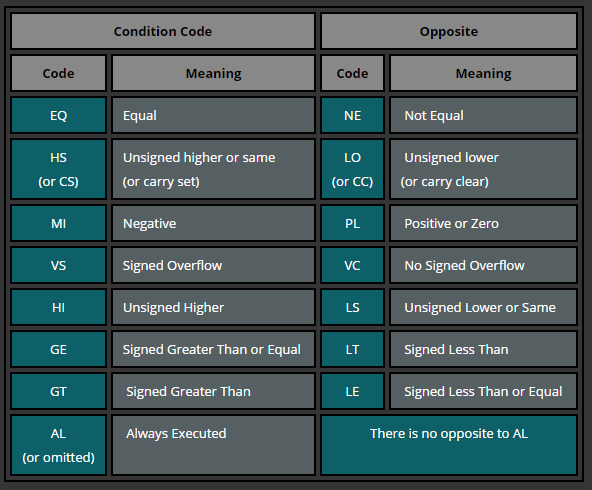
Here are the conditional codes and their opposite:
Let's try this out with the following example code:
.syntax unified @ this is important! .text .global _start _start: .code 32 add r3, pc, #1 @ increase value of PC by 1 and add it to R3 bx r3 @ branch + exchange to the address in R3 -> switch to Thumb state because LSB = 1 .code 16 @ Thumb state cmp r0, #10 it e eq @ if R0 is equal 10... addeq r1, #2 @ ... then R1 = R1 + 2 addne r1, #3 @ ... else R1 = R1 + 3 bkpt
.code 32
This example code starts in ARM state. The first instruction adds the address specified in PC plus 1 to R3 and then branches to the address in R3. This will cause a switch to Thumb state, because the LSB (least significant bit) is 1 and therefore not 4 byte aligned. It's important to use bx (branch + exchange) for this purpose. After the branch the T (Thumb) flag is set and we are in Thumb state.
.code 16
In Thumb state we first compare R0 with #10, which will set the Negative flag (0 – 10 = – 10). Then we use an If-Then-Else block. This block will skip the ADDEQ instruction because the Z (Zero) flag is not set and will execute the ADDNE instruction because the result was NE (not equal) to 10.
Stepping through this code in GDB will mess up the result, because you would execute both instructions in the ITE block. However running the code in GDB without setting a breakpoint and stepping through each instruction will yield to the correct result setting R1 = 3.
maynardsundis1937.blogspot.com
Source: https://azeria-labs.com/arm-conditional-execution-and-branching-part-6/
0 Response to "How to Continue Loop in Armsim After Error"
Postar um comentário